Priority Matrix lets you create new items by sending an email to a special address. You can create items in your own Priority Matrix inbox, or directly into a specific project. Combining this with Outlook's powerful rule mechanism, it's possible to configure a smart system that automatically classifies your most important emails directly into Priority Matrix.
To understand this process, we first need to know how forwarding to Priority Matrix works, and then we will see how to utilize it with Outlook.
Forwarding emails into Priority Matrix
Priority Matrix provides a series of special email addresses that can be used to automatically create new items by sending them messages. The subject of the message will become the title of the item, and the body of the message will become the notes of the item. There are special addresses for
your PM inbox, as well as for every one of your projects. To obtain your desired secret address, see these options:
- You can get your general inbox address via your special links page, toward the top
- You can get an address for a specific project in the same page, but further down (make sure to select a Q1-4 quadrant first)
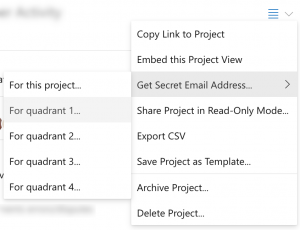
- You also can select one of your projects in our web app, then use the hamburger menu to get the address you need
Setting up Outlook rules to create PM items
Note: If the instructions below don't match your experience, you can create similar rules in
Outlook Web App, which may be more convenient.
Note 2: There are dozens of versions of Outlook, for Windows, Mac, web, and more. If your screen doesn't look exactly as describe, see if there are similar steps you can take. Write to us if you need assistance.
Once you have your secret email address from the section above, let's see how to create a forwarding rule in Outlook 2016. By creating a rule, you can selectively and automatically forward emails from Outlook into Priority Matrix.
- Open Outlook and go into the Rules tab, then select Mail Rules & Alerts

- Pick "New Rule..."

- You can either apply the "send to Inbox" rule to incoming or outgoing mail. Select the one you'd like and click "Next".

- Now pick your conditions! You can choose as many or as few as you'd like (with more conditions, fewer emails will be sent to PM). Once you're satisfied, click "Next" again.

- Now we need to tell Outlook where to send your messages. Select "forward it to (people or public group)." But don't click Next!!!! Click on the "(people or public group)" hyperlink in the bottom box.

- If you can't see this box pop up, go back to step 6. Once you do, paste your copied secret address in the To -> box. It will be something long, ending in @appfluence.com. Now click OK and the Next > button from the last step.

- Finally, are there any emails you want excepted from this rule? If so, select them here. Once done, or if there are no exceptions, click Next > again.

- Before finishing, give your rule a memorable name, and decide if you want to run the rule on your past messages or just future ones, and hit Finish.

- Outlook will ask you to confirm the rule once more before it starts applying it to incoming messages.

That's all! Now you can repeat the steps above for each kind of message that you would like to forward into PM, and see how your workflow gets smarter with each step!