Priority Matrix for Teams is a fully functional project management solution. It aims to help your team focus on the key tasks that deliver the most value for your organization. Achieve piece of mind knowing that nothing falls through the cracks, and that everyone is working toward the common goal.
In this document we explain the basic functionality of Priority Matrix for Teams, but there is no substitute to exploring the system and trying to get things going by yourself.
Table of Contents
Microsoft Teams Integration
Adding a tab to a chat or channel
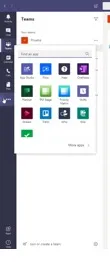
You can add different kinds of Priority Matrix tabs to your Teams chats and channels. For example, you can include a full project view, or a one-on-one tab. The process is straightforward:
- Click on the + button on the tab bar
- Select the Priority Matrix button
- Sign in with your Priority Matrix account if you haven't done so yet
- Finally, choose between a 1-on-1 tab or a project view tab
If you choose a one-on-one tab, you can decide whether to configure the one-on-one to preload a specific user, or to leave it blank and let the user select the user in each case.
On the other hand, if you choose a project view tab, you are given the choice of picking any of your Priority Matrix projects to be shown. Additionally, you can make the project editable, or read-only. If you choose to let others edit the project, be sure they have access by making them project members in Priority Matrix. If the project is shown in read-only mode, users don't need to be members of the project in order to be able to view its details. To make things simpler, you can add collaborators to a project the moment you instantiate its tab on Teams.
If you no longer need a tab in your chat or channel, select the tab, click "display options" and select "Delete".
Installing the Priority Matrix app on Teams
Chances are that you're reading this from inside Teams, and therefore this point is moot. But in case you're exploring the manual prior to installing the app, before you can do much work with Priority Matrix, you or your administrator need to install the app on Teams. Again, the steps are pretty easy. The fastest way is to click on the
Apps button on the left rail, then type "Priority Matrix" in the search box, and select it. Then just follow on-screen instructions to create an account if you need one, or sign in.
At that point, once you run through the installation dialog, you will find a new Teams app with several tabs:

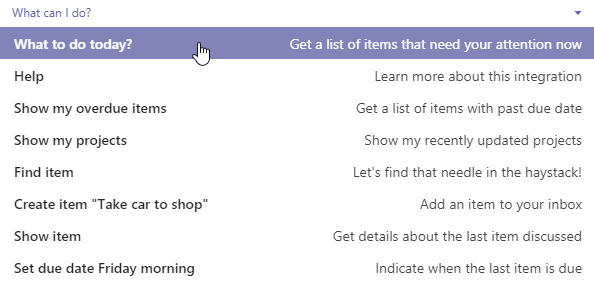
- In the Chat tab you will find our chat bot. There is an autocomplete list with suggestions for things you can ask. For example, type "show my overdue items" or "What to do today?" and we will get back to you with some insightful answers.
- In My Projects you can find the entire Priority Matrix app. You can use every feature available in our general web app.
- One on One is a tool that lets you see tasks, events and documents shared with a teammate.
- My Team is a view that shows the tasks that each of your collaborator has been working on most recently. Think of it as the pulse of your organization.
- The Feed tab shows you all the changes that anyone in your team has made to projects and items that you can access. It's essentially a log of comments, task completions and other important events.
- In the Calendar tab you will find all your tasks in calendar format, for easy scheduling. Of course, only tasks with a due date will appear here.
Webapp Overview
Priority Matrix for Teams is heavily based on the Priority Matrix web app, only with some modifications to better fit in the Teams ecosystem. Therefore, it's important to understand the Priority Matrix way.
The four-quadrants method
The fundamental system upon which Priority Matrix is based is called the four-quadrants method. Simply put, this method allows you to organize your tasks and thoughts based off of what needs to be done now, what can wait, and what tasks should be delegated. If a task is critical, it goes on the top half of the matrix. If it's immediate, it goes on the left half of the matrix. That way:
- Q1, on the top-left, is for critical tasks that cannot wait. Do this now, and do it yourself.
- Q2, on the top-right, is for important things that need some more thinking, or which can be done once a crisis is over.
- Q3, bottom-left, is for menial tasks that should nevertheless be done quickly, because of some deadline or other external factor. You might want to delegate some of them.
- Q4, on the bottom-right, is for everything else, things that you want to capture for the future and maybe let them sit until you find yourself available, or they gain importance in your organization.
This is the standard Priority Matrix method. But you can use other templates, and customize your work as you need.
Creating new projects and items
In order to create a new project, or matrix, open the project list, choose the "new project” button, and follow instructions to pick a template, choose colors, or even import external data.

Once inside a project, you create new items by either double-clicking on an empty spot in a quadrant, or using the "Add item" buttons that appear when you hover the mouse over a quadrant.
Item details
When you select an item, on the right side panel you will see a number of fields:
- Set your due/start dates
- Update your progress from 0% to 100%
- Add effort, and add a reminder
- Add an icon to visually sort your tasks
- Attach files
- Add notes
- Chat with your team in the conversation box
- Use chat commands to update the status of the item (see on-screen instructions for this)
If you decide that an item needs to be prioritized differently, simply drag it onto a different quadrant, or a different position in the same quadrant.
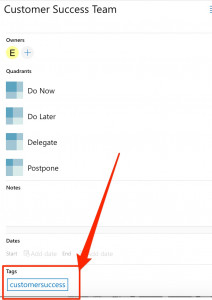
Project details
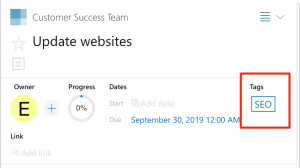
When you select a project, the panel on the right hand side shows project details such as quadrant names and colors, start/end date for the project, and extensive notes. You can click and edit any of those elements as needed. Additionally, you can classify your project using tags, a flexible way to group similar things together.
Further, you can add project members, choosing among your collaborators, and even invite someone new if needed. Make sure to include everyone who is working on the project, for full transparency. More on this below.
Collaborating with your teammates
Priority Matrix excels is in its collaboration features. You can work with people in your own organization, but also with anyone outside, as long as you share access to a project, or to an item. You can even work with complete strangers, by sharing a read-only link to a project, or by making a public item, meaning they can even send you comments without having an account in the system.
Adding project members
The list of users who have access to a project are called the project members. All members of a project have equal access to any of the items contained in that project. In order to add a new owner to a project:
- Open the project from your project list
- At the top of your screen, select the person icon, to the right of the project name
- In the panel that emerges, select a preexisting user, or type any valid email to invite someone entirely new to the system
Depending on the system preferences for the invited user, they might be added to the project directly, or they could just be invited to do so, awaiting their explicit approval.
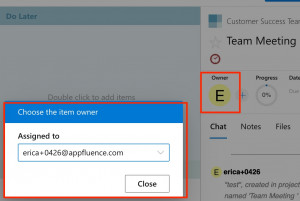
Assigning an item to a teammate
The owner of an item is the person currently responsible for completing the work. It's easy to change the item owner:
- Click the item you want to delegate
- On the right hand side in the item details click the largest avatar, labeled “owner”
- In the emerging panel, select the new item owner, or enter their email if you don't see them
The conversation box
You may have noticed that every Priority Matrix item has a chat box. You can use that to discuss the specifics of a given item with anyone involved (any follower). You can use this as a regular chat box, with the nice attribute that only people for whom the message is relevant will be notified. You can have several ongoing discussions with different people, and there's no confusion as to what's the topic being discussed. In contrast, when you use a general team chat, conversations are noisier because everyone is notified all the time, and the discussion topics rotate frequently.
Additionally, the conversation box is also a log of any relevant changes that have been applied to the item, like reminders, due dates, updates to the completion percentage, etc.
Most interestingly, you can also use the chat box to interact with the item, if you find that more natural than clicking or tapping around. For example, you can enter commands like:
- Assign to me
- Delegate to John
- Invite Mike
- Remind Tom in 30 minutes
- Remind everyone tomorrow
- Remind me daily until done
- Due Tuesday afternoon
- 50%
- Important
- Tag marketing
- Done
- Move to quadrant 2
- Etc.
Try it out and explore the options. If you have suggestions for new commands, please do let us know as we keep iterating this powerful system.
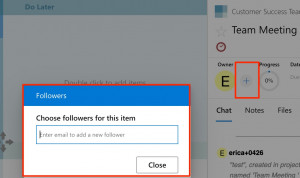
Adding followers to an item
The followers of an item are all the users who get notifications about relevant changes, like completion, due dates, reminders, chat messages, etc. Adding followers to an item is quite similar to changing the owner:
- Select the desired item
- In the item details panel, choose the “+” icon
- In the emerging panel, choose the user or users who you want to add, or add their email address if they are not shown
- These users will now receive direct updates about this item
Read-Only View
As we mentioned earlier, it's possible to share a project in read-only mode with anyone on the internet, even if they don't have a Priority Matrix account. This is perfect, for example, if you want to share progress with a customer or investor for transparency, but do not necessarily want them to make any changes to the details. Or you can share your active project in a company or personal blog, to "work in the open" and build an audience that way.
To get a read-only link to a project, follow these steps:
- Select the desired project from your project list
- On the top-right menu, click “Share Project in Read-Only Mode”
- You will get a popup box with a link that you can share directly with anyone
- In the same box, there's a button to get instructions on how to embed that view in a blog, website, etc.
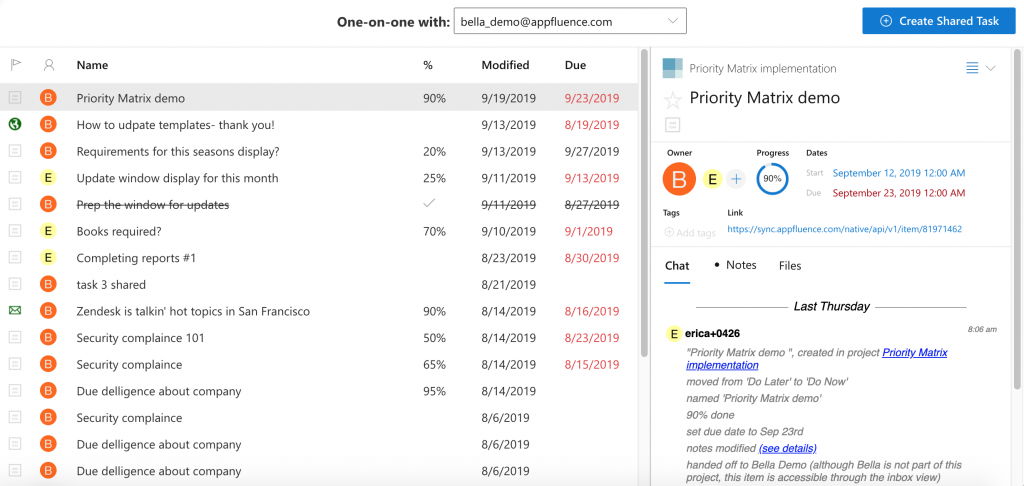
1-on-1 view
The 1-on-1 view shows you a list of all the top priority items yourself and one other user on your team are working on together. You can use this to prepare for a meeting with someone, or even to run the meeting itself, quickly referring to ongoing tasks, shared documents and events.
To use the 1-on-1 view, select the "1 on 1" button in the main menu (on Teams, it should be its own tab at the top), then pick the person that you want to collaborate with. Immediately you should see the list of shared items, sorted by their modification date (more recent ones on top). Additionally, you should be able to see OneDrive documents, Outlook messages, even Planner tasks that you share with that person.
Using item icons to organize visually
In order to differentiate your tasks in a visual way, we provide a rich set of icons to denote various concepts. Depending on the title of your tasks, the system might be able to suggest an initial icon for you (i.e. emails, money, events...). To change the icon for a given item, first select it, and then you can either:
- Click the current icon in the details panel, and select a new one, or...
- Using the chat box, issue a command like "icon 6", "icon fire", etc.
Search view
In most Priority Matrix views there is a little magnifier icon, or a funnel button, that lets you filter down your current view to match specific criteria. For example, you can choose to see only unfinished items with a due date within 2 weeks. And further filter to only items you personally own.
At a higher level, in the main menu (at the top when inside Teams), you can access a Search view which lets you look for a specific item in your Priority Matrix account, using a powerful search engine. Additionally, you can quickly sort and rearrange results, which helps if you want to have a high-level view of all your tasks, across all projects.
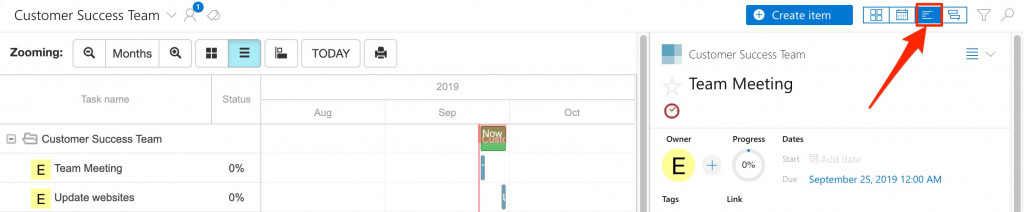
Gantt chart
Gantt charts are also known as timelines, and they show tasks in a format that lets you see the total amount of time each task is expected to take, and in what order. They are a fundamental tool in project management, because they help visualize bottlenecks, highlighting possible schedule conflicts. The Gantt chart in Priority Matrix is accessible via the top level menu, but also at the individual project level, if you want to focus only on items from a narrower scope.
You can expand or collapse individual projects, or even quadrants. It's also possible to rearrange items by dragging their start and due dates, and you can select them and edit them just as you would when looking at an item in any other Priority Matrix view.
Project and Task Organization
Priority Matrix is a very flexible tool, which can be used for a number of purposes and business environments. The key is to develop your own system of data classification and prioritization. We provide you with the basic building blocks and a rock-solid framework, but the sky is the limit, and if you prefer to use the system in a different way, who are we to say no?
Project and item tags
In order to group similar projects or items together, Priority Matrix provides a powerful tagging feature, which you can use, for example, to:
- Separate projects by scope such as marketing, engineering, support...
- Identify projects related to a specific customer
- Separating personal and work related projects
- Tagging items related to a specific event (i.e. tasks related to organizing a conference)
- Flagging critical items with the "starred" tag so they appear at the top of your screen
In order to add tags to a project or item, start by selecting it, then click on the tags section, in the details panel, and then add (or delete) the tags that you need. Once you do that, you can use the filter system, at both the project and item level, in order to show only matching content.
Archiving a project
When you are done working on a specific project but you don't necessarily want to delete it, in case you need to refer to it in the future, you can simply archive. This is performed by assigning a special project tag named "archived" which lets the system know it shouldn't show you the project unless you explicitly request it. You can also:
- Select the project you want to archive
- Open the details menu on the top-right
- Click "Archive project" in the popup menu
If you later want to see your archived projects, click the funnel button in the project list view, and select the project tag "archived" in the emerging panel.
Sorting projects and items
Once you have enough data captured in Priority Matrix, it becomes important to be able to sort and arrange your projects and data in a way that lets you quickly find what you're looking for. To that purpose, we have added functionality to sort projects in the following modes:
- Alphabetical
- Manually arranged
- Last updated
Similarly, you can sort individual items within a quadrant or a list by the following criteria:
- Manually
- Alphabetically
- By modification date
- By due date
- By icon
- By completion percentage
In order to change the sort mode, click the funnel icon on the project list or a specific matrix view, and use the selector in the emerging panel.
Notifications and reminders
When a relevant event occurs to one of the items or projects that you follow, you will see a red counter in the button that opens your home view, indicating the number of unread notifications you have. Clicking it opens the alerts tab inside your home view, and you see the list of items that need your attention. The events that trigger a notification include:
- A comment by a teammate
- An item being assigned to you
- An item's start or due date has arrived
- Someone uploaded a file
- A reminder has been triggered
- An item was completed
You can also tell Priority Matrix to deliver some of these notifications via email if that's your preference. For that, open
https://sync.appfluence.com/accounts/unsubscribe/ and enable the "instant emails" checkbox. Make sure to add
support@appfluence.com to your address book so that messages are properly delivered.
News feed
Toward the end of the main menu you will see a "feed" button. When you click on it, it takes you to a view that shows you a detailed summary of all the changes that happened to projects and items in your accounts. It's essentially a higher level aggregate of what you see at the individual item level. You can keep it open to monitor changes as they happen, or just open it first in the morning to see what your team was working on before your sat down. There is a similar feed view at the individual project level, which gives a more focused version.