Notifications on macOS serve as alerts from applications to keep you informed about new messages, updates, and other relevant information. They can be incredibly useful for staying on top of important tasks and communications. However, there may be times when you find these notifications to be more distracting than helpful. In such cases, macOS provides a straightforward way to manage these alerts.
This guide will walk you through the steps to turn off notifications for any app on your Mac, including Priority Matrix, and how to reverse the process if you decide you want them back.
Turning Off Notifications in macOS
Follow these steps to disable notifications for any application on your Mac:
For newer macOS versions (Ventura and later)
- Open System Settings: Click on the Apple logo in the top left corner of your screen and choose “System Settings” from the dropdown menu.
- Navigate to Notifications: Scroll down the sidebar in the System Settings window until you find “Notifications.” Click on it to open the notification settings.
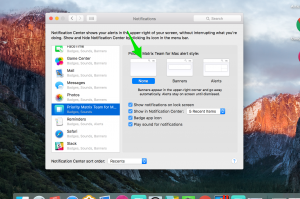
- Select the Application: In the Notifications panel, you’ll see a list of applications. Scroll through and click on the application for which you want to change notification settings.
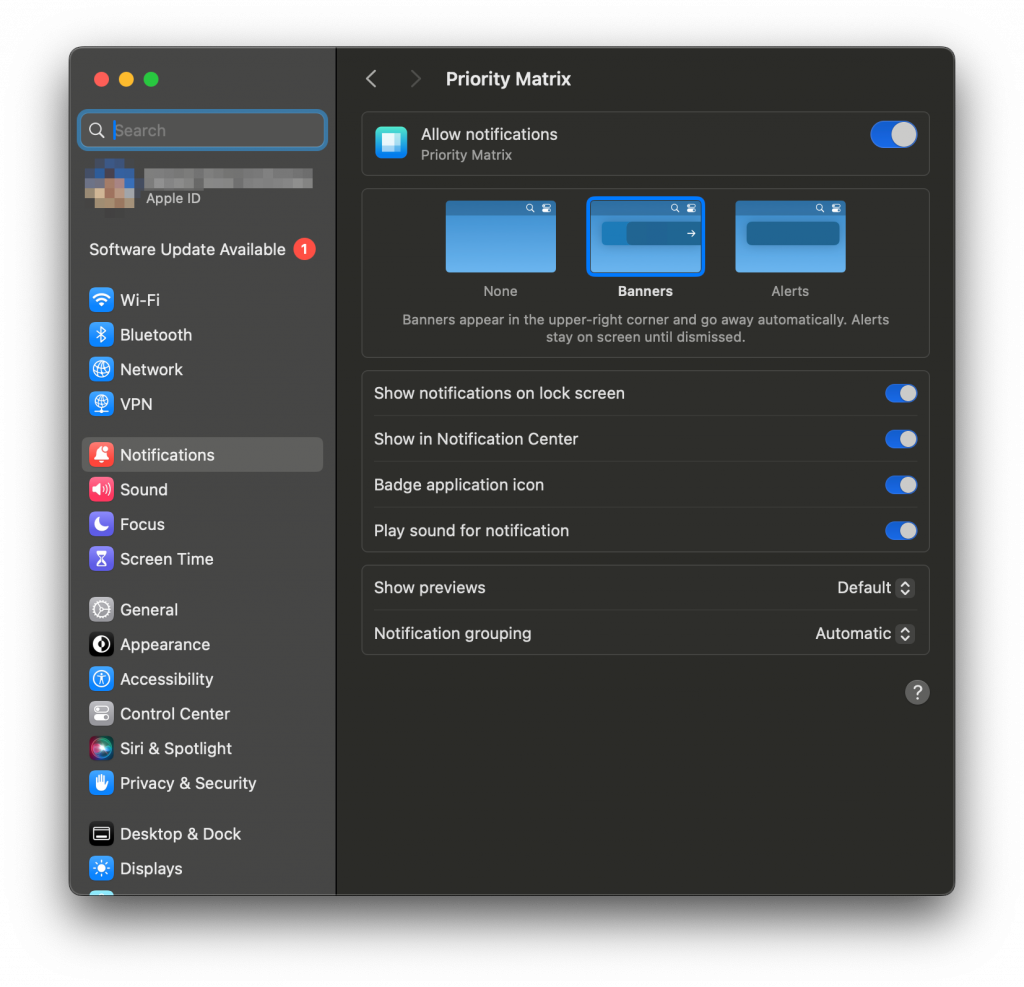
- Disable Allow Notifications: At the top of the application’s notification settings, you’ll see a toggle next to “Allow notifications.” Click this toggle to turn it off. This will disable all forms of notifications including sounds, banners, alerts, and badges for the app.
- Customize Notification Settings: Alternatively, you can keep notifications enabled but customize specific aspects:
- Toggle off “Badge application icon” to remove the red notification badges
- Toggle off “Play sound for notifications” to mute notification sounds
- Change the alert style (None, Banners, or Alerts) according to your preference
For older macOS versions
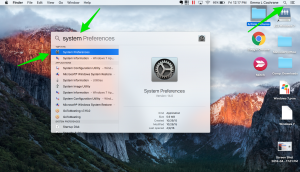
- Find the magnifying glass in the upper right-hand corner and click on it. A search bar will come up. Type in “System Preferences” and click on System Preferences.
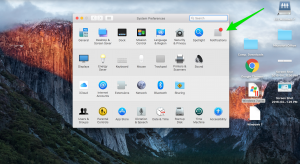
- From the System Preferences, click on the “Notifications” icon.
- In the left column, find and click on the application for which you want to turn off notifications.
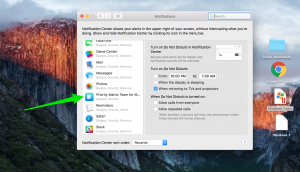
- Turn your notifications off by selecting “None” for the alert style, and uncheck any other notification options you wish to disable.
- Exit out of this window to apply your changes.
Specific Instructions for Priority Matrix
Priority Matrix integrates deeply with macOS and normally delivers system notifications to alert you of important updates in your account, such as:
- Messages from colleagues
- Tasks assigned to you
- Reminders and due dates
To specifically disable notifications for Priority Matrix:
- Follow the steps above to access the Notifications settings in System Settings/Preferences.
- Scroll through the applications list and select “Priority Matrix”.
- To completely disable notifications: Toggle off “Allow notifications”.
- To only remove badge icons (the red numbers on the app icon): Keep notifications enabled but toggle off “Badge application icon”.
Re-enabling Notifications
If you decide that you want to start receiving notifications again, you can easily enable them by reversing the process:
- Open “System Settings” (or “System Preferences” on older macOS versions).
- Navigate to the “Notifications” section.
- Find and click on the application for which you want to enable notifications.
- Toggle on “Allow notifications” or choose your preferred notification style (Banners, Alerts, or Badges).
- Adjust other settings as necessary.
- Close the window to apply your changes.
Testing Your Notification Settings
To ensure your notifications are properly configured (either enabled or disabled as intended), you can test them with Priority Matrix:
- Create a test task: In Priority Matrix, create a new task that you can use for testing.
- Set a reminder: Add a reminder or due date to this task that’s 5-10 minutes in the future.
- Click away from Priority Matrix: Switch to another application or minimize Priority Matrix so that the notification will need to alert you.
- Wait for the reminder time: When the reminder time arrives:
- If notifications are enabled: You should receive a system notification about the task.
- If notifications are disabled: You should not see any notification appear.
- Verify settings: If the notification behavior doesn’t match your expectations, revisit the notification settings using the steps described above.
This simple test ensures that your notification preferences are correctly applied and working as expected.
Additional Tips for Managing Notifications
- Focus Mode: Consider using macOS Focus mode to temporarily silence notifications during important work sessions without having to disable them completely.
- Selective Notifications: For many apps, you can customize which types of events generate notifications, allowing you to receive only the most important alerts.
- Notification Center: Remember that even with banner notifications disabled, your notifications still appear in Notification Center, which you can access by clicking the date/time in the menu bar.
- App Functionality: Turning off notifications for an app will not affect its functionality; it will merely stop notifying you about updates or changes.
Managing your notification settings is a good way to control your focus and workflow. Customize them to suit your preferences and work style to minimize distractions while staying informed about what matters most to you.