Priority Matrix offers a flexible and intuitive way to import tasks and projects from CSV files. This functionality allows for seamless transitions between different project management tools or for incorporating data from other sources.
Preparation:
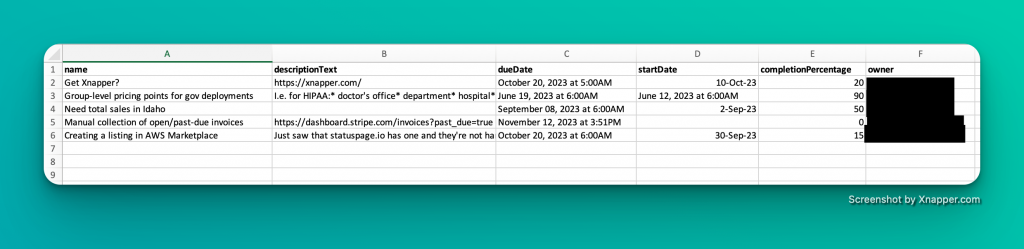
Before importing, it's crucial to understand the format that Priority Matrix expects. The first image provided gives us a glimpse of this format, showcasing the following fields:
- name: The name of the task or action item.
- descriptionText: A URL or additional description about the task.
- dueDate: The date by which the task is expected to be completed.
- startDate: The date the task is set to commence.
- completionPercentage: A numerical value representing how much of the task has been completed.
- owner: The email of the person responsible for the task.
This is not an exhaustive list; Priority Matrix may have additional fields. To get a full understanding of all fields, it's advisable to first export a project from Priority Matrix. This exported file will give you a complete template to work with.
Steps to Import a CSV into Priority Matrix:
- Prepare Your CSV File: Ensure your CSV file is formatted correctly. Use the format shown in the first image as a guide. Remember to include all necessary fields, especially the "owner" field which should contain valid email addresses.
- Access the Import Function: As per the second image, navigate to project creation section in Priority Matrix, where you can import a CSV file. This is typically located near the top or left bar.

- Choose a Destination: You have two options when importing:
- Import as a New Project: If you choose this, your CSV data will be used to create a brand new project in Priority Matrix.
- Import into an Existing Project: Alternatively, you can add the tasks from your CSV into a project you've already created (for this, open the project-level menu instead and choose "Import from CSV..."
- Upload and Review: Select your prepared CSV file and upload it. Before finalizing the import, review the data to ensure it maps correctly to the fields in Priority Matrix.
- Finalize Import: Once you're satisfied with the preview, confirm the import. Your tasks will now be added to Priority Matrix.
- Check the Imported Data: Navigate to the project (new or existing) where you imported the tasks. Review the data to ensure everything was imported correctly.
Tips:
- Always backup your current Priority Matrix data before performing an import to ensure you can revert changes if necessary.
- Regularly update the owner's email list to ensure that tasks are correctly assigned.
With these steps and tips, you can easily and efficiently import your tasks and projects into Priority Matrix using CSV files. Happy organizing!