As you may have seen, Priority Matrix can be a great tool for property managers looking to improve their daily task efficiency. Our software is perfect to unify, organize and prioritize tasks. Also, it’s great to coordinate work between team members, even those on different rental management projects.
In our last post on the Best Templates for Property Managers, we showed how Priority Matrix can fit the needs of a property management team. You can read about some great features that will ease your day-to-day workload – and we’ll continue to show you more!
However, what you’ll find here today are the Priority Matrix basics you need to know about to start managing properties right. This is an entry-level quick guide to understanding how Priority Matrix works. Continue reading to learn how to do everything we’ve shown you Priority Matrix does for Property Managers!
Here’s what you’ll find in this article:
- Everything you need to know about creating projects and all their features
- How to manage different properties with several projects
- BONUS feature for Property Managers
Create Property Manager Projects: Quadrants, Items, and Teammates
To create a new project on the Priority Matrix web app just go to “Projects” on the left-hand side vertical bar on your home screen. Click on “Add Project” on top of your project list. This list might be empty if you’re new and haven’t been invited to any existing project.
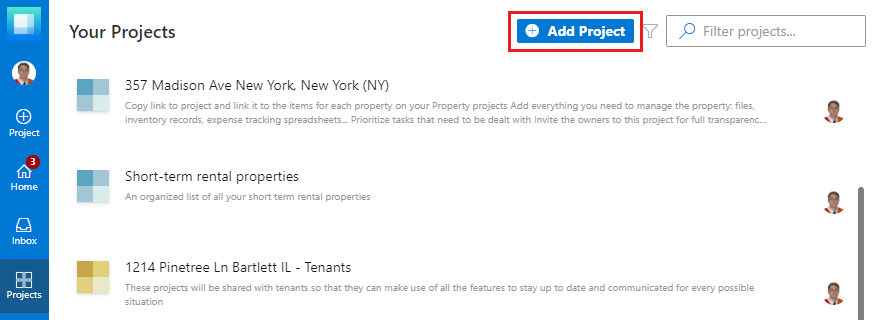
Now you’ll have the chance to choose one of our already existing “Public Templates” (among which you will be able to find our Property Management Templates). Under the section “My Templates” you’ll have templates your company has made available uniquely for your team!
If you want to create your personalized project just hit “Blank Project” and start editing!
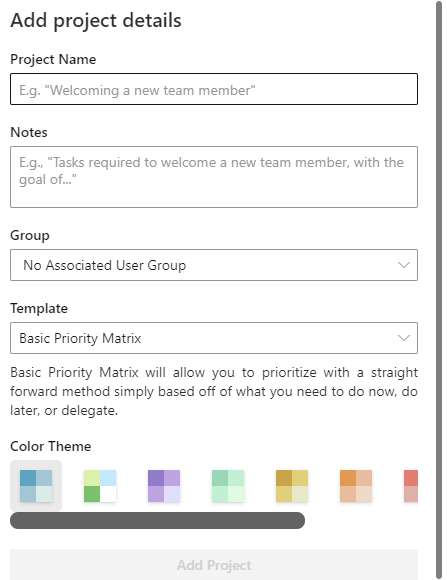
Add your details for the project name and basic notes (if you want to add any right now). Then select what color theme you want for your Matrix! Don’t worry, you can change it later to whatever color you want.
As for User Groups, they’re made in your organization to make it easier to assign projects or items. If there aren’t any Groups or you don’t want to assign the project to any, just leave it on “No Associated User Group”. Even if there aren’t any associated groups to the projects you can add members easily at any time.
Once you hit “Add project” it’s done! You now have a new project that you can start modifying easily to cater to your Property Management needs!
Editing a project is easy – Priority Matrix’s intuitive design was built to shorten the learning curve for beginners. You won’t have a problem going over the platform! Just in case, here’s what your blank project will look like and how to personalize it for your own needs:
Project & Quadrants
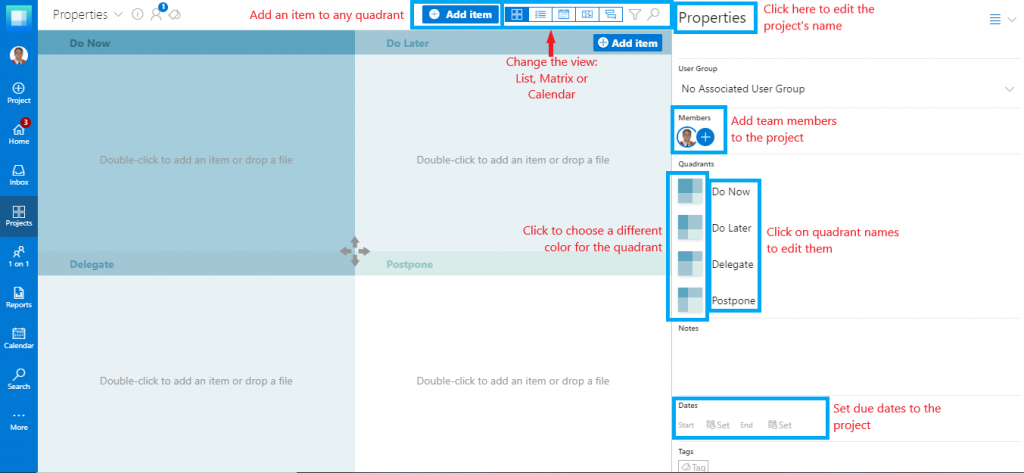
If you’re not seeing the Matrix view, change it by clicking the different view symbols to change it! The first one is the Matrix view. To the right, you’ll find the List view, Calendar view, Gantt Chart view, and Feed view (many of these may come in handy at any point, but for now the Matrix view should be your most useful).
To change the name of the quadrants go to the right panel and click on any of their names to edit them. You can customize the matrix’s colors by clicking on the quadrant icons next to the names!
Below the Quadrant section on the control panel you’ll see the “notes” section – click there to add some. These notes can be anything from a description, to your main goals or important issues regarding the project. You can also set deadlines for the projects to have a reminder of any important date. For property managers, this could be the start and end dates of a lease contract.
Items
Items are the basic content for each of the projects you create. They’re most usually tasks you need to complete either alone or with your team. However, you can use them in any way you find necessary! Use them to hold important information, links, resources, or as a hyperlink to other projects on a Dashboard Property Project, like we’ll show you below (at managing different projects at once).
Creating an item
Add items to any of the quadrants by double-clicking a quadrant. You can also click on any of the “Add Item” buttons that you’ll see on top of the matrix or any of the quadrants. Choose which quadrant you want to add the item to. But don’t worry about choosing the wrong quadrant. You can easily move your items by clicking and dragging them to any other quadrant you prefer! This is what you’ll see when adding an item:
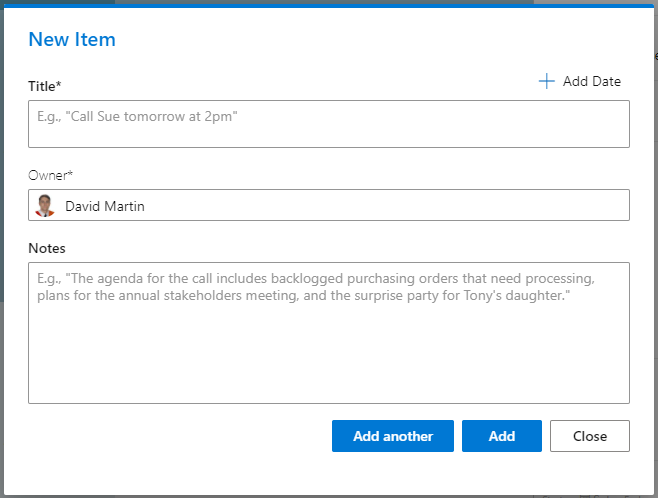
Set a title and select the owner of the item (by default it’ll be whoever created the item – but you can add new members or assign a new owner any time). You can also add any important notes and add a date as a deadline or reminder date for the item! Once it’s created, click on it to see the control panel. There you’ll find all the features you can take advantage of.
Item features
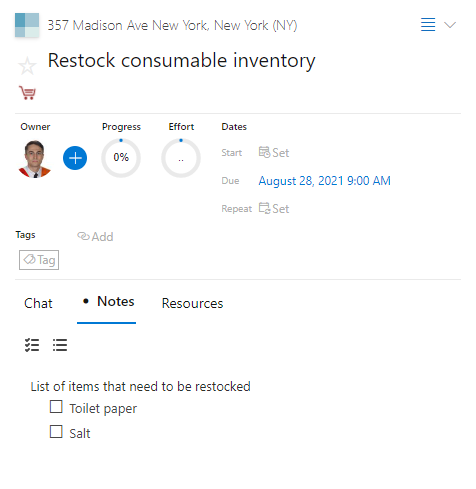
On this example item, you can see most of what you can do on the item’s control panel. Starting from the top you’ll see the Project’s name (in this case a property task project) and under it, the Task’s title. To the left of that, you’ll see the silhouette of a star to highlight the item. Under that you’ll see the following features:
- Set an Icon for that item by clicking on the “add icon” button below the star. Use them to have easy visual help when going over the tasks on your matrix
- Click on the owner to assign the item to anyone on your team or add new members that should be involved in completing the task
- Progress and Effort indicators can be modified to let you or your teammates know how you’re doing with that task
- Set start and finish dates or recurring deadlines to get notifications on the tasks and see them on the calendar view
- Add tags to later filter items – you can create your own tags like “inspections”, maintenance, cleaning, rent… to search for items with the same tag across different projects.
- Under the “Notes” section you can write down anything important or related to the item. You can add checklists, comments, or links that will also automatically appear on the “Resources” section.
- The “Resources” section lets you add links and upload documents or files to the Priority Matrix secure cloud. You can also link a related item.
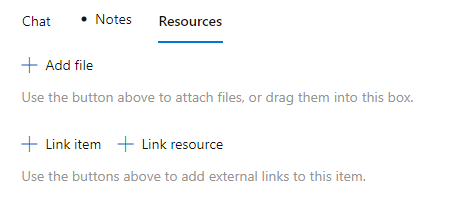
- On the left, you’ll see a Chatbox where you can have a conversation, discuss issues or inform teammates easily. You can also add any resources and links, as well as write commands that Priority Matrix’s intelligent chatbot will recognize – e.g: “assign to Tom” to make him the item owner, or “due tomorrow morning” to change due dates and times
Teammates and item members/followers
When adding a new item on Priority Matrix you’ll be the owner and only member of the item by default. If the item is part of a shared project with a team, they’ll all have access to the item from the project, although they won’t get any reminders or notifications related to the progress or the edits that happen to the item.
You can add new followers to your item by clicking the “+” symbol next to the owner’s picture. You can change the owner with chatbot commands (“assign to X”) or by clicking on its picture. Anyone in your organization can be a member of the item – they don’t have to be on the project’s team.
This way you can share items with anyone in your organization inside Priority Matrix. This means you’re able to share resources, chat, comment, and coordinate work instantly and easily with any coworker or other people involved in a task or a Property. On dashboard projects, add members to the property item that are part of the team in charge of the house. While on Property tasks projects you can assign duties to teammates and keep them updated in real-time.
Managing Different Properties: Dashboard Projects and Overall Calendar
Now you know how the basic functions of Priority Matrix work. However, there are still two features you need to dominate to fully take advantage of our tool as a Property Manager: Creating dashboard projects that link to individual property matrices and handling a multiple project calendar.
Property Dashboard Projects
Property managers need several projects to manage all their properties and chores for each one of them. In our article Best Templates for Property Managers, we lay out 2 templates with different purposes:
- Property Dashboard Project and
- Property Tasks Project meant for each one of the rental estates that are being managed.
This way you can have all your properties organized in the same place plus one Matrix with everything you need to do for each one of them. But, how do you manage so many projects on the same platform?
The answer, as we’ve pointed out before, is simple: each one of the properties listed on the Dashboard Projects as items function also as a link to each one of the Property Tasks Projects. This way, you can access each project easily and only have to worry about your Dashboard Projects.
So, how do you link projects to items?
1- Open any of the Property Tasks Projects and go to the main control panel that appears on the right-hand side of the screen.
2- Click on the icon on the top right corner of the control panel to show more options.
3- You’ll see a bunch of different features that could come in handy at some point. For now, just click on “Copy Link to Project” – a link to the project will be saved onto your PC’s clipboard.
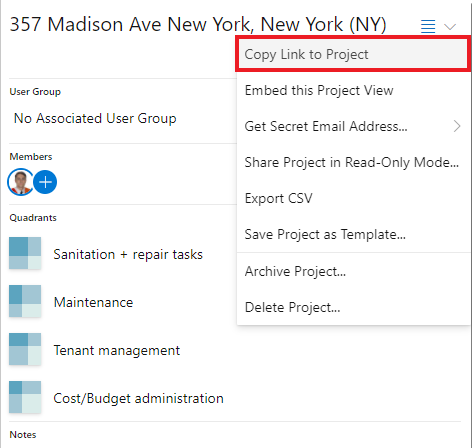
4- Go to your Property Dashboard Project and open the item that you want to link to the project. For property managers, this will be the item that matches the same property as the project you just copied the link from.
5- On the item’s control panel, click on “Resources” and then on “Link Resource”.
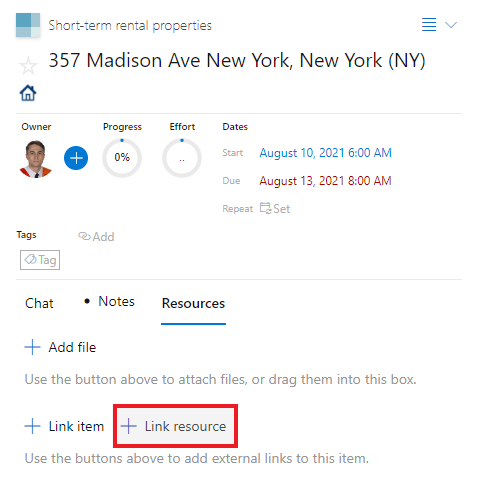
6- Paste the link and name it however you like (e.g.: “Property Tasks Project”).
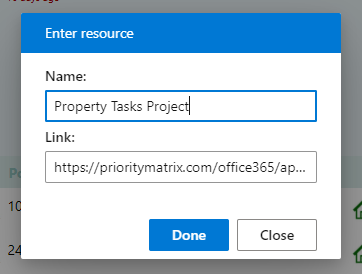
You’re done! This quick copy-paste process will allow you to create a great dashboard project to manage all your properties on Priority Matrix easily!
Managing a Multiple Project Calendar
When you access Priority Matrix you’ll directly appear on the home view of the left vertical bar. There you’ll see different features and views of all your projects and items. We’ve developed these features to coordinate, organize and prioritize work.
One of these options is your overall calendar view for all your projects. Here you’ll see all the items you own, or that have been assigned to you, as well as other items you follow. The items show the icon you assigned them when they’re due, their name, and the owner of the item. Here’s how an example calendar looks like:
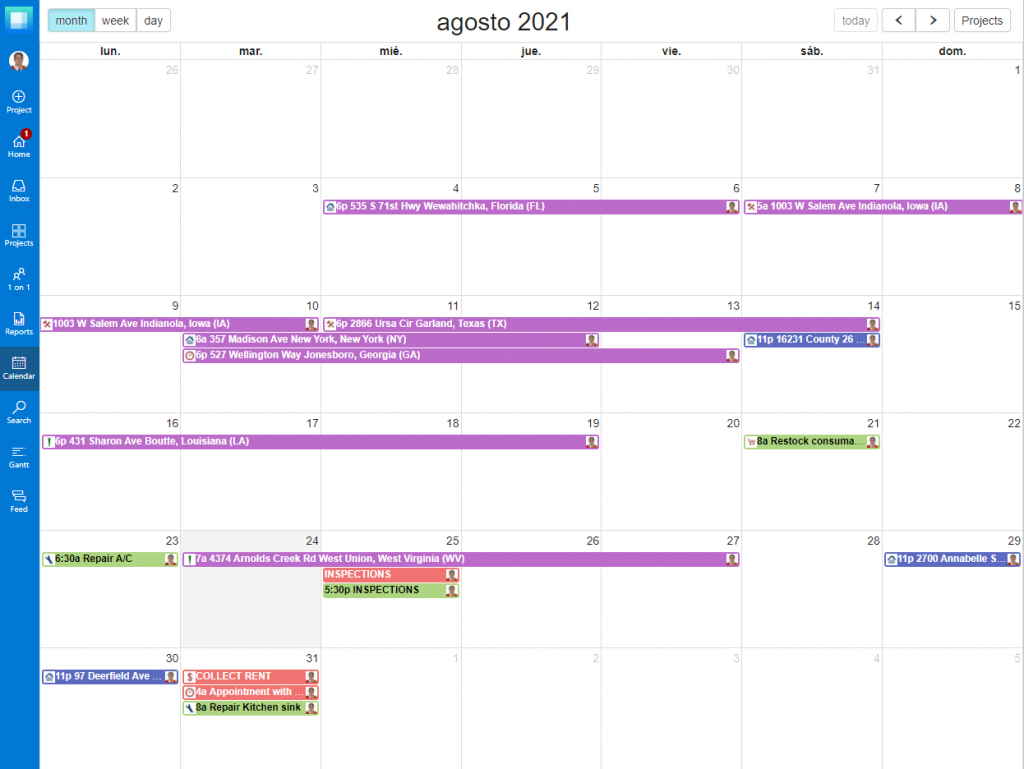
This calendar shows both examples of the short-term and long-term Property Dashboard Projects, plus two examples of Property Tasks Projects. But there’s no limit to how many projects you can view, add as many as you need!
So, what you can do to make the most out of this view as a Property Manager?
- Click on any item of the calendar to access it or its project directly. You’ll see the item’s control panel to the right of your calendar.
- On the top left corner, you can change the view to focus only on what’s next during the following week or what you have to do on a specific day! Both of these options will give you a better detailed view of the time, so it’s perfect for appointments!
- On the top right corner, you can go forward and backward on your calendar to check the following months, weeks, or days.
- Click on “Projects” to filter your calendar by Projects and select just the ones you want to see. There you can also customize the color for each project to have a better view of what item corresponds to each property or dashboard project!
- Click on any date or time to add a new item. This way you can use the calendar as an agenda for your appointments or future tasks. When you do so, select which project you want to add the item to and its quadrant – it’s that simple! These items will also automatically appear on your project matrix or any other view you choose.
Now you know everything about the benefits of working with Priority Matrix as a Property Manager and how to make the most out of it!
But these are just the basics. Continue exploring Priority Matrix and its functionalities to learn everything it can do for you! As a bonus, here’s one more feature that could come in handy as a Property Manager:
Sharing projects with third parties: show transparency to your landlord clients!
In the Property Management Business, trust between landlords and property managers is key. They need to feel safe and that you’re committed to having their best interest in mind when taking care of their house or any other property. This is why transparency can play a huge role in building this trust and ensuring a good relationship.
In this regard, there’s no better way to keep the landlord updated with the work you do than sharing access to the information that you’re working with. How can you do that without compromising your work and how you organize and take care of your tasks? Our feature “Share Project in Read-Only Mode” may be the solution for you.
We designed this feature to keep clients and project owners updated with its progress. It’s simple, just click on the top-right icon for “more options” on the project’s control panel and select “Share Project in Read-Only Mode”, as you see in the picture below.
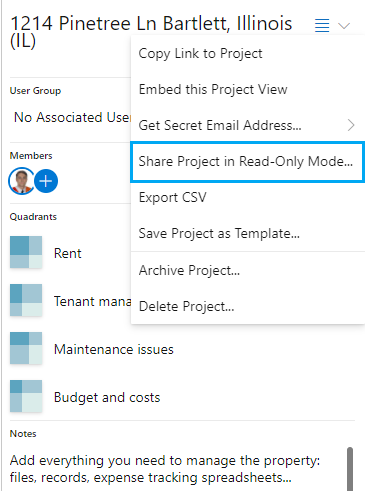
The software will generate a link that allows access to the project. Anyone who has the link can inspect the entire project, including every item, but they cannot make any changes. Share the link via email or whatever messaging system is more convenient for you!
Sign on to Priority Matrix and start unleashing your full management potential! Upgrade your team’s productivity and grow your property portfolio – with Priority Matrix managing multiple properties is a lot easier for everyone!