This article is about how you can start and deselect starred tasks in Windows. Starring Projects can be fun! It’s like giving a golden sticker to a task to make it priority. But how do you find them? How can you single them out and make them feel special? And how do you deselect a starred task if you change your mind? Easy! Follow these simple steps below for your Windows:
Star And Deselect Starred Tasks In Windows
1.) If you want to filter and star by PROJECT, select the particular project you wish to star tasks.
2.) From here, click on the specific task first. In the “Item Details” tab, you will see in the top left corner a picture of a hollow star icon.
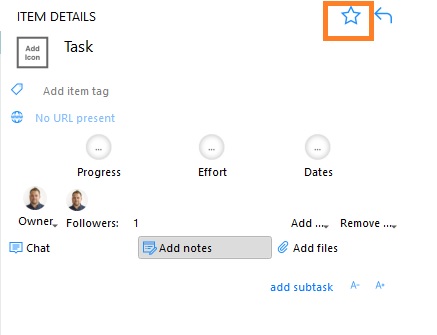
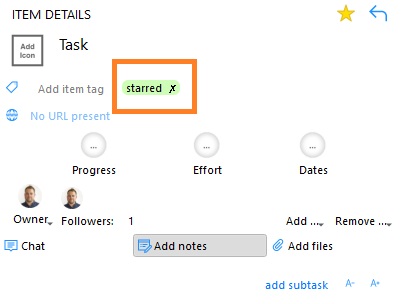
3.) Go ahead and click on the hollow star icon, and it will fill up with a YELLOW color. Also, you will notice your task will automatically be tagged as “starred” by an oval greenish bubble. So you can easily find it later.
4.) You can find the starred tasks WITHIN a certain project by clicking the project on the left, and going to the “Item Tag Filter” on the top by the search bar. It looks like a funnel. Click on it and a drop down menu will appear. Click “starred” to select ONLY the starred tags.

5.) If you want to find starred tasks across all your projects, go to the “Master View” list first. Second, hit on the “All” quadrant button. Finally, go to the “Item Tag Filter” and select “starred” tags.

After you have selected the “starred” tag from the drop down bar, only your projects with starred tags will appear in the project bar on the left. In the “Master View” list, only your starred tags will appear. The rest will disappear. This will show you the projects and tasks that are starred.
Moving on with how to star and deselect starred tasks in windows…
7.) In order to deselect a task being starred, simply click on the task in the list and go over to “Item Details” and click on the star to deselect the starred tag. You will see the star will become hollow again and the oval green tag “starred” will be removed from the “add item tag” area.
8) Finally, in the “Master View” list, you will see the previously starred tag has been removed back to being a regular task which you can see without using the starred tag.
Boom! You are now a Star Jedi! Hope this helped inform you on how to star and deselect starred tasks in Windows!
***If you wish to obtain a report of your starred items on a weekly basis (or any tagged items), this amazing feature will be available under the Business License Link.